
 BETA
BETARecently I designed an engagement ring for my (now-)fiancée, from scratch. This was a fascinating and challenging process, and gave me a new appreciation for both the art and engineering of jewellery design.
The first step in the process was to make a collection of existing designs that we both liked. Heather already knew that she liked diamonds with a step cut shape (such as the emerald cut) so this narrowed it down. Here is one of the pages of our initial design exploration:

We visited a local jeweller, who showed us some designs in similar styles. There were a few features that were missing though; for example, I really liked the gap between the center stone and halo in the vintage ring. For practical reasons I also wanted to design a ring that had a low side profile, as I had nightmares about Heather losing a ring finger in machinery.
Granted, I’m sure a good jeweller could have designed something fitting the bill, but I had been doing a bit of CAD recently and I thought… how hard would it be to design a ring myself?
(The answer, it turns out, is that it’s surprisingly hard if you haven’t done it before. I did intermittently find myself wishing that I was working more closely with a jeweller, but it was a labour of love…!)
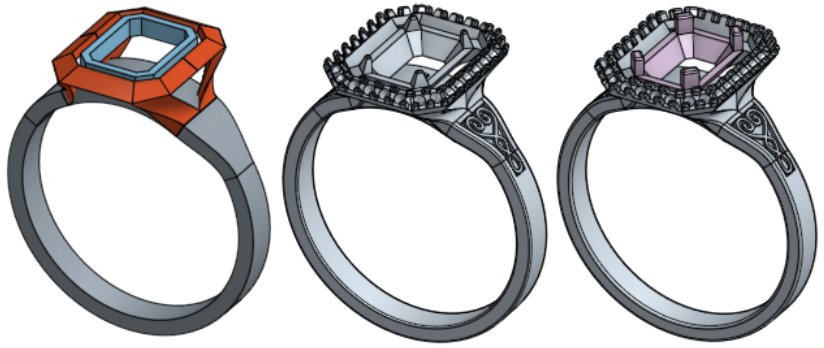
Here you can see the evolution of my design in Onshape, from an initial shape, to the detailed design of halo and shoulder, and then some final changes based on manufacturing feedback:
The final design was manufactured using a lost wax casting process. In this process, the model is first 3D printed in a wax-like resin. A flask is placed around the model and flooded with a plaster-like investment material. Once the investment has hardened, the wax model is melted out, and metal is cast in the chamber that remains.
The printing and casting was done by Pure Casting in Sydney, who did an amazing job. I wasn’t sure how the design on the shoulder would turn out; the raised design is only about 0.2mm high, and about the same in line width, so it requires very high resolution. But it turned out perfectly. Pure Casting also arranged polishing and stone setting for me. (I thought briefly about doing it myself, but this time I decided against it!)
Here is a photo of a draft cast in silver, unpolished and without stones:

And here is the final ring:

Here are some notes about this design:
- In the final design, the ring is manufactured in two pieces and soldered together at the end, otherwise it would be difficult to polish in between the parts. (Thank you to Gillian at Pure Casting for this and other good advice.)
- The majority of ring designs use round/cylindrical prongs, but I used rectangular prongs here. I felt that this better suited the angular nature of the emerald cut, and I also think that this shape may be slightly better mechanically (a round prong with the same diameter has less metal, while a round prong with the same area is harder to bend over). Originally I added taper angles to the prongs, but it was suggested to keep them simple and leave finishing details to the setter.
- The majority of designs use flat or nearly-flat halos, but each face of this halo is inclined outwards significantly (35 degrees). Again, I wanted to echo the faces of the emerald cut, as well as providing a softer side profile to the ring. This means, however, that each of the eight faces of the halo is in a different plane, and this made the placement of the halo diamonds and prongs more challenging.
- To make sure the dimensions were right, I measured the actual diamond dimensions and angles from macro photos, and built a CAD model of the diamond. I did find a lot of curiosities; for example, I was also expecting the corners of an emerald cut to be cut at 45 degrees, but in fact they were around 42 degrees, and one corner was slightly ‘off’. The key with any gem setting, therefore, is to design in some tolerance.
The biggest challenge in the design was the engraving-like design on the shoulder of the ring. I was inspired by vines but, not having the artistic ability to draw vines, I made it more geometric. The final engraving design took all of my CAD knowledge, and some spline mathematics, to implement.
Heather and I are both thrilled with the end result. Thank you again to Onshape for building an awesome CAD system, and to Pure Casting for turning my design into reality.
