How to remove bicycle pedals the easy way
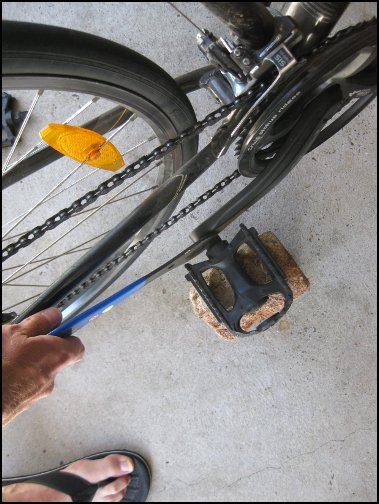
A lot of guides on the Internet are overly vague as to how to position the pedals to get good mechanical advantage. Here's my easy no-fuss method that allows you to use your weight effectively and doesn't require a repair stand:
- Move the pedal crank you're working on so that it's pointing towards the rear of the bike (i.e. 9 o'clock or 3 o'clock depending on the side).
- Place a block under the pedal itself so that it won't move downwards. An upright brick works well.
- Stand over the back wheel of the bicycle, leaning over the bicycle seat, to keep the bicycle steady.
- Place your wrench over the axle of the pedal, with the wrench towards the back of the bike, and push downwards with your weight.
- Repeat for the other side, also with both crank and wrench pointing backwards.
If at first you don't succeed, try the following:
- Check you're going the right way.
- The pedal should move freely downwards if you remove the brick (on a normal bicycle with a freewheel). If you're pushing against the drive system, you're going the wrong way.
- The right pedal unscrews the 'right' way (anti-clockwise) and the left pedal unscrews the 'wrong' way (clockwise).
- Apply a rust-penetrating lubricant to the pedal thread from the inside of the crank. Wait a while and try again.
- Check again you're going the right way.
- Hit the end of a wrench with a hammer.
- Check again you're going the right way.
- Use more leverage, e.g. by putting a pipe on the end of the wrench.
